IPsec Tunnels
CONFIGURE > NETWORK CONNECTIONS > IPsec Tunnels
On the IPsec Tunnels page, you can create, edit, and delete IPsec tunnels.

To create an IPsec tunnel:
-
Click CONFIGURE > NETWORK CONNECTIONS > IPsec Tunnels.

-
Click CREATE TUNNEL. This opens the EDIT IPSEC TUNNEL page.

-
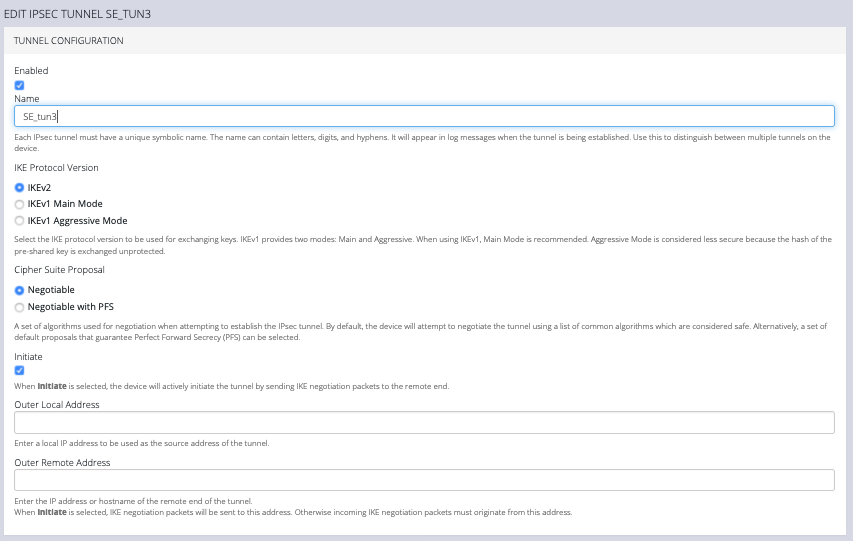
In the top section of the page, TUNNEL CONFIGURATION, click the Enabled check box and give your new tunnel a name.
-
Select an IKE Protocol Version to use for exchanging keys. IKEv1 provides two modes: Main and Aggressive. When using IKEv1, Main Mode is recommended. Aggressive Mode is considered less secure because the hash of the pre-shared key is exchanged unprotected.
-
Select a Cipher Suite Proposal. This is a set of algorithms used for negotiation when attempting to establish the IPsec tunnel. By default, the device will attempt to negotiate the tunnel using a list of common algorithms which are considered safe. Alternatively, a set of default proposals that guarantee Perfect Forward Secrecy (PFS) can be selected.
-
Click the Initiate checkbox to actively initiate the tunnel by sending IKE negotiation packets to the remote end.
-
Enter an Outer Local Address, a local IP address to use as the source address of the tunnel
-
Enter an Outer Remote Address, the IP address or hostname of the remote end of the tunnel.
-
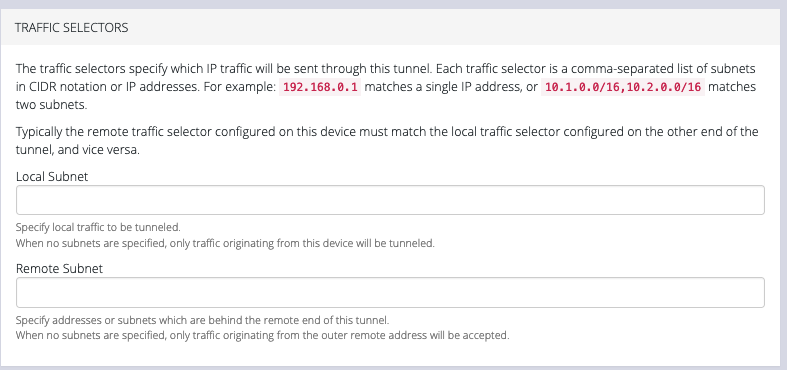
Scroll down to the Traffic Selectors section of the page.

-
Enter a Local Subnet and Remote Subnet.
-
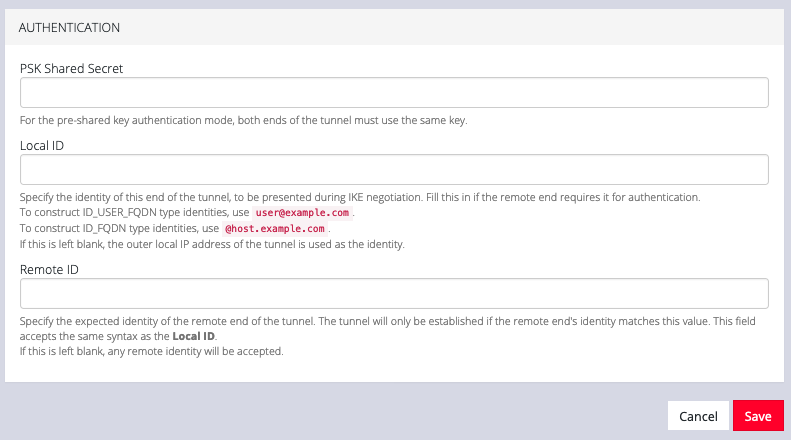
Scroll down to the third section, AUTHENTICATION.

-
Enter a PSK Shared Secret.
-
Enter a Local ID and Remote ID.
-
Click Save. The new tunnel is now listed on the CONFIGURE > NETWORK CONNECTIONS > IPsec Tunnels page.